Run Sql Online by Uploading Excel File Data
This article explores an SSIS package for importing multiple Excel files data into SQL Server tables.
Introduction
Recently I come across a state of affairs in which 3rd-political party vendors ship multiple Excel files to load data into SQL Server tables. We tin can use SSMS Import and Export Wizards for data import. You can read more than about this in How to import/export data to SQL Server using the SQL Server Import and Export Wizard.

Suppose you received multiple Excel files (let'south say 50) for data import. You need to launch an import wizard 50 times and complete it. It is a manual, ho-hum, and fourth dimension-consuming task.
Every bit I started earlier in my manufactures, SSIS is a true friend for DBA and developers. It comes for rescue in such situations. Let's explore the SSIS solution in this commodity.
Sample information
For this article, I want data import from the following Excel files:

Each Excel file contains one row, and source cavalcade shows the excel file name:

Prerequisites
- SQL Server Data Tools or Visual Studio 2019
- SQL Server instance
Create an SSIS package for the data import from multiple Excel files
First, nosotros will create an SSIS packet for importing a single Excel file data into the SQL Server table. After, nosotros will catechumen the same package and import multiple Excel files information using SSIS variables and parameters.
Create a SQL table for information import
We require a SQL table that will have data from SSIS import functioning. Execute the following script for creating a SQL tabular array for data import:
| CREATE TABLE [ dbo ] . [ SSISDataImport ] ( [ EmpID ] [ int ] Nix , [ EmpName ] [ varchar ] ( 50 ) NULL , [ Source ] [ nvarchar ] ( 50 ) Goose egg ) ON [ PRIMARY ] Go |
Add a Source excel file connection
Open Visual Studio and create a new SSIS bundle projection. In Control Flow, right-click and go to New Connexion:

It shows all available connexion types. Click on EXCEL connection manager and add it:

In Excel Connection Manager, provide the path of Excel file, and it automatically selects the Microsoft Excel versions. The kickoff row of the Excel sheet contains the column header; therefore, we take a cheque on the Outset row has column names option:

Click OK, and it shows the Excel connectedness in the connections manager area:

Add a destination OLE DB connexion
Now, add a destination OLE DB connection manager. Click on add new connection and select an OLE DB connection:

Add SQL Server instance name, hallmark (windows\SQL) in the OLE DB connection managing director:

We take both source and destination connections in the connection managing director window. We will use these connections in the information menstruation and command flow tasks of the SSIS package:

Add a data catamenia task for information import from Excel to SQL table
Add together a Data Flow Job in the Control Flow. This information flow task will flow data from the Excel files into SQL Server tables:

Rename Data Flow Task to Information import from multiple excels files. It is an optional footstep. Even so, it is a better approach to renaming the tasks. Nosotros can easily recognize the chore desired behavior using the custom names:

Double-click on this data menstruation task, and information technology takes you to the Information Flow tab. Elevate an Excel Source to the data flow. A cherry cross icon shows that configuration is required for this SSIS task:

Double-click on this excel source and in Excel Source Editor, select the Excel canvass that contains data. We should have data on similar sheets of all Excel files:

Click on Preview, and we can get a glimpse of the Excel sheet information:

In the left-paw menu, click on Columns and verify the Excel canvass columns. If nosotros want excluding whatsoever column from data import, we can remove the checkmark from the item column:

Click on OK, and it shows the successful connection of an Excel Source:

Now, drag an OLE DB Destination and connect it with the Excel Source using blue precedence constraint:

Double-click on OLE DB Destination and information technology opens the OLE DB Destination Editor. Specify the OLE DB connection and SQL table that we created before:

Nosotros need to verify the source and destination mapping. Click on Mappings and verify it:

Click OK, and information technology verifies the conversion mistake betwixt Unicode and non-Unicode string information types:

To resolve this, we need a Data Conversion task from the SSIS toolbox. Drag information technology from SSIS toolbox and connect it with the Excel Source:

Double-click on Data Conversion. It opens the Data Conversion Transformation Editor. Select the Input Column (Source) and change the data type as Unicode_string[D_WSTR]. We too alter the EmpName data type as String[DT_STR]:

In the above screenshot, we also changed the output column alias. Click OK and add precedence constraint from data conversion chore to OLE DB Destination:

We can still run into a red cross on the OLE DB Destination task. It requires a configuration with the new columns that we derived from the data conversion.
Open the OLE DB Destination Editor again and navigate to Mappings. In the Mapping, alter the input columns, as shown below:

Click OK. We can see that all configuration of the SSIS package is successful:

Execute the package, and it shows successful data import from a single Excel file:

Now, execute the following TRUNCATE TABLE statement to configure SSIS bundle data import from multiple Excel sheets:
| TRUNCATE TABLE [ SQLShack ] . [ dbo ] . [ SSISDataImport ] ; |
Disable SSIS project debugging
Right-click on the SSIS projection and become to properties. In the debugging menu, disable the Run64BitRunTime option:

Click Utilise and OK to save changes.
Add variables in SSIS bundle
Nosotros will employ SQL variables for defining multiple Excel sheets in a for each loop. Correct-click in data flow and add variables.
- Directory: Information technology holds the path of all Excel files
- ExcelPath: It holds the path of an Excel file along with file name

Under the Connection Manager, click on the Excel Connection Director and view its backdrop. Click on Expressions, as shown below:

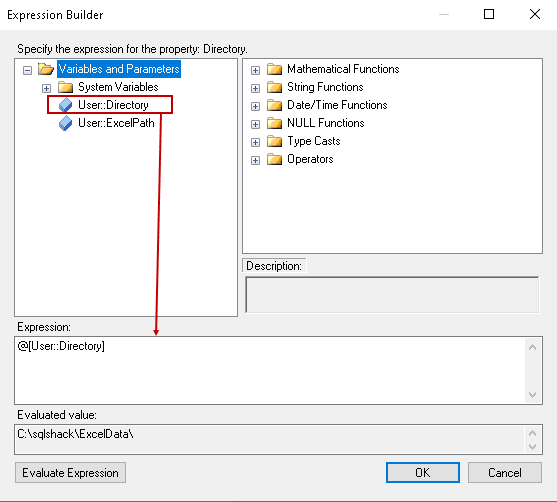
In the Expression Builder, expand the Variables and Parameters binder. Drag the variable [User:: ExcelPath] to the expression and evaluate the expression. Information technology should testify the variable value we defined earlier:

Click OK, and yous can see the variable in the Property Expressions Editor:

Click OK, and information technology shows a symbol "fx" in the Excel Connection Director:

Configure a Foreach Loop Container for data import from multiple Excel files
At present, get back to Control Flow and elevate a Foreach Loop Container. We apply this container for starting a loop for the number of executions specified. You can read more than about For Each loop in the Using SSIS ForEach Loop containers to procedure files in Date Club and SSIS Foreach Loop vs For Loop Container:

Elevate the Information import from multiple excel files task into the Foreach Loop Container:

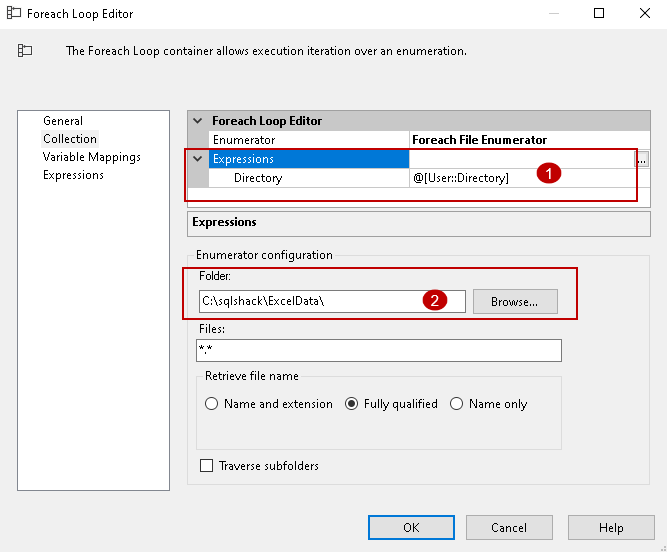
Double-click on Foreach Loop Container, and it opens the following loop editor. Brand the following changes:
-
In the Expression, click on eclipse and specify the variable User:: Directory. You can also evaluate an expression, and it should prove the value of the variable, as shown below:
-
Under the Folder, specify the path of the folder. We want data import from all files in this folder, so we have specified *.* in the files section:


Now, click on Variable Mappings and map the User:: ExcelPath variable as shown beneath. It automatically takes index value nothing:

Click OK, and information technology completes the configuration of SSIS bundle for importing multiple files:

Before executing the parcel, allow'southward verify that our SQL table does non have whatsoever data:

Execute the SSIS bundle using the Start push:

SSIS Package is successful now. You can see a light-green tick icon on the Foreach Loop Container and data import task:

Allow's verify data in the SQL table. In the following screenshot, using the source table, we can verify that we have information from all Excel files. We have data from EmployeeData-1 to EmployeeData-x:

Nosotros should have a similar column structure in an Excel file for data import. You tin configure additional tasks for error handling or capture bad data. Accept reference of An overview of Error Treatment in SSIS packages for it.
Conclusion
This article explores the process of importing multiple Excel files into SQL Server table. It saves manual efforts and expedites the data import process with N number of files. You tin schedule a SQL agent job for SSIS packet execution for frequent tasks.
- Author
- Recent Posts

Hi! I am Rajendra Gupta, Database Specialist and Architect, helping organizations implement Microsoft SQL Server, Azure, Couchbase, AWS solutions fast and efficiently, gear up related issues, and Performance Tuning with over 14 years of feel.
I am the author of the book "DP-300 Administering Relational Database on Microsoft Azure". I published more than 650 technical manufactures on MSSQLTips, SQLShack, Quest, CodingSight, and SeveralNines.
I am the creator of one of the biggest free online collections of articles on a single topic, with his 50-office serial on SQL Server Always On Availability Groups.
Based on my contribution to the SQL Server customs, I take been recognized every bit the prestigious All-time Author of the Year continuously in 2019, 2020, and 2021 (2nd Rank) at SQLShack and the MSSQLTIPS champions honour in 2020.
Personal Blog: https://www.dbblogger.com
I am e'er interested in new challenges so if yous need consulting help, reach me at rajendra.gupta16@gmail.com
View all posts past Rajendra Gupta
Source: https://www.sqlshack.com/import-data-from-multiple-excel-files-in-sql-server-tables-using-an-ssis-package/
0 Response to "Run Sql Online by Uploading Excel File Data"
Post a Comment